A sharp carbon steel knife slices through food like butter—clean, precise, and effortless. But when it dulls, every cut becomes a struggle. Unlike stainless steel, carbon steel demands attention, but it rewards you with faster sharpening and a keener edge. The key to mastering how to sharpen carbon steel knife lies not in brute force, but in finesse: the right tools, consistent angles, and a methodical grit progression. This guide cuts through the noise, giving you a step-by-step process grounded in expert technique and real-world results. Whether your blade is slightly dull or has a chipped tip, you’ll learn how to restore it to razor-sharp performance—without damaging the steel or wasting time.
We’ll walk you through selecting the best stones, detecting the elusive burr, refining the apex, and maintaining your edge between sessions. No guesswork, no myths—just a clear, actionable system that works.
Choose the Right Sharpening Stone for Carbon Steel

Your sharpening stone makes or breaks the process. Carbon steel responds well to abrasives, but the wrong stone can over-grind or leave a ragged edge. Whetstones are the top choice for control and refinement.
Use Water Stones for Fast, Controlled Sharpening
Synthetic water stones are ideal for carbon steel. They cut quickly, provide excellent feedback, and produce a slurry that enhances sharpening. Soak stones like Naniwa Pro, Shapton Kuromaku, or King 1000/6000 combo for 5–15 minutes before use. Beginners benefit from the King combo’s affordability, while pros often pair a Naniwa 1000 with a 5000 or 8000 for a refined finish. For ultimate performance, Japanese natural stones (J-Nats) like the Oohira Model 40 create a “toothy” edge that grips food without crushing—perfect for slicing herbs or tomatoes. These stones don’t have standardized grits but deliver unmatched bite and feel.
Skip Diamond Stones Unless Repairing Damage
Diamond stones remove metal fast—too fast for most carbon steel sharpening. On soft grades like 1095, they can gouge the blade and create a large, stubborn burr. Reserve them for chipped or severely damaged edges. When using diamond, apply feather-light pressure and switch to water stones immediately after to refine the edge. Never use diamond as your final abrasive.
Use Sandpaper for Curved Blades or Practice
For recurve or small blades, flat stones can’t reach the full edge. Wrap 600–2000 grit wet/dry sandpaper around a Pringles can or PVC pipe that matches the blade’s curve. This method ensures full contact and preserves geometry. It’s also a low-cost way to practice angle control and pressure consistency.
Set and Maintain the Correct Sharpening Angle

Angle determines how sharp and durable your edge will be. Too shallow, and it chips; too steep, and it feels dull. Carbon steel’s hardness allows for sharp angles without sacrificing strength.
Aim for 15°–20° Per Side Based on Knife Style
Japanese-style carbon steel knives perform best at 15° per side. Western-style blades, like carbon chef’s knives, suit 18°–20°. To estimate 15°, stack two U.S. quarters under the spine near the edge—the angle formed is very close. Use an angle guide if you’re learning; it helps build muscle memory for freehand sharpening.
Keep the Angle Consistent from Heel to Tip
Inconsistent angles cause uneven bevels and weak spots. Focus on keeping the same height throughout each stroke. Watch for mirror symmetry in the bevels—both sides should look identical. If one side is wider or shinier, you’re applying more pressure or strokes there. Practice on an old blade or scrap metal first.
Follow a Logical Grit Progression for a Durable Edge
Sharpening isn’t about speed—it’s about precision. Skipping grits or rushing the process leaves scratches and a fragile edge.
Start at 1000 Grit to Establish the Bevel
Use a 1000 grit stone to set the primary bevel and repair nicks. Apply moderate pressure—enough to feel the stone cutting, but not grinding. Use 10–15 sweeping strokes from heel to tip, ensuring full edge contact. Your goal: raise a burr, a tiny wire edge that signals you’ve reached the apex. Test by gently dragging your fingernail perpendicular to the edge. If you feel a lip, you’re on track.
Refine with 3000–5000 Grit to Remove Scratches
Switch to a 3000–5000 grit stone to smooth out coarse scratches. Use lighter pressure and 5–10 strokes per side. Maintain the same angle. At this stage, the burr should begin to break off. Inspect under bright light or magnification—look for a uniform scratch pattern across the bevel.
Polish with 6000+ Grit for a Razor-Sharp Finish
Finish on an 8000 grit stone or natural stone like Oohira Model 40. Use barely any pressure—let the stone polish the apex. This step enhances edge stability and gives the blade a smooth, biting feel. You’ll notice it slicing paper or tomato skin with zero resistance.
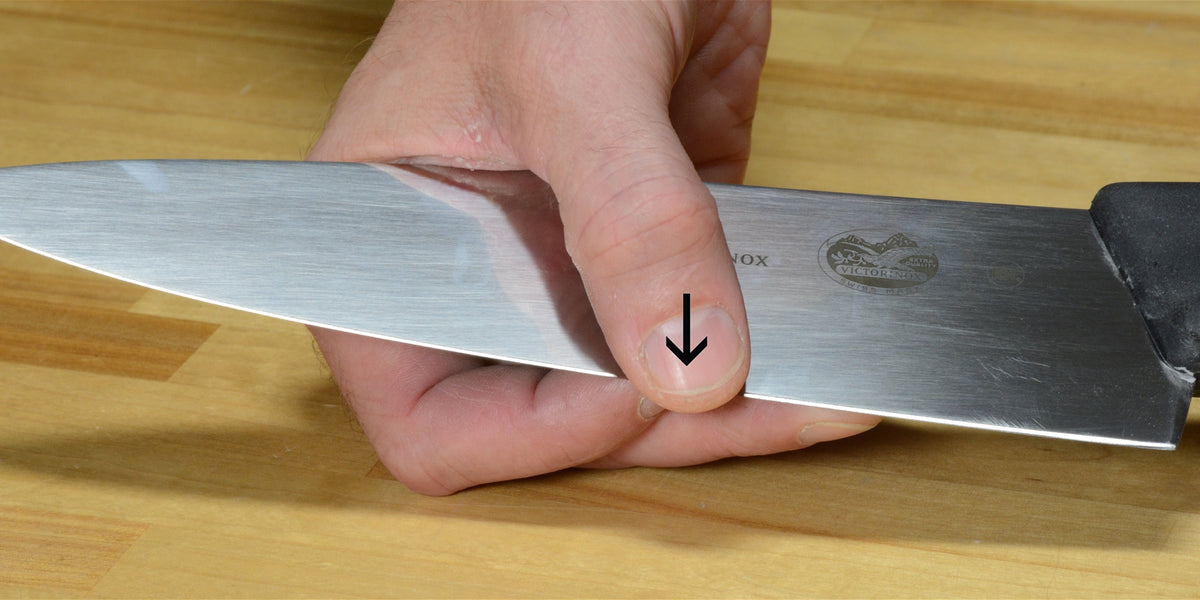
Detect and Eliminate the Burr for a Clean Edge
The burr is your best indicator that you’ve sharpened to the apex. Missing it leads to a dull edge; ignoring it wastes steel.
Feel for the Burr Along the Entire Edge
After sharpening one side on the 1000 grit stone, check for a burr by running your fingernail perpendicular to the edge from spine to tip. Start at the heel, move to center, then tip. Repeat on the opposite side. If you feel a lip, the burr is present. If not, continue sharpening that side.
Alternate Sides to Control Burr Formation
Once a burr forms on one side, switch to the other with fewer strokes (3–5) to prevent over-grinding. Flip back and forth, reducing pressure each time, until the burr runs evenly along the edge. Then, use finer stones to remove the burr completely through polishing and stropping.
Finish with a Leather Strop for Ultimate Sharpness
Stropping doesn’t sharpen—it refines. A leather strop polishes the apex and removes the last remnants of the burr.
Use Bare Leather or Honing Compound for Polishing
Pull the blade edge-leading across the strop, heel to tip, with minimal pressure. Do 10–15 strokes per side. For extra refinement, apply green honing compound to the leather. This adds mild abrasion, helping achieve a mirror finish. Never press hard—the strop should only remove the wire edge.
Avoid Over-Stropping
If your knife only feels sharp after long stropping, the real issue is poor sharpening—likely inconsistent angles or skipped grits. Fix the root cause; don’t rely on the strop to compensate.
Sharpen Curved or Recurve Blades with Custom Backings

Flat stones fail on curved blades because they only contact part of the edge, leading to weak spots.
Wrap Sandpaper Around a Matching Curve
For recurve blades, wrap 600–1000 grit wet/dry sandpaper around a Pringles can or PVC pipe that matches the blade’s curve. Secure with tape. Use edge-leading strokes, maintaining consistent pressure. Flip sides regularly and check for burr formation.
Match the Radius for Full Edge Contact
Choose a backing with a diameter close to the blade’s curve. Too large or too small, and contact drops. This method ensures even abrasion and preserves original geometry.
Avoid Common Sharpening Mistakes
Even experienced users make errors that degrade edge quality.
Don’t Use Excessive Pressure
Heavy pressure grinds metal, creates micro-serrations, and risks overheating the edge. Use light, consistent strokes—think spreading butter, not chopping wood.
Never Skip Grits
Jumping from 1000 to 8000 grit leaves coarse scratches unrefined. The edge may feel sharp but dulls fast. Always progress: 1000 → 3000 → 6000+.
Flatten Dished Stones Regularly
Over time, stones develop hollows, leading to uneven sharpening. Flatten them with a lapping plate or diamond flattening stone. A flat surface ensures full edge contact.
Maintain Your Knife Between Sharpening Sessions
Proper care extends edge life and reduces how often you need to resharpen.
Clean and Dry Immediately After Use
Wash by hand, dry thoroughly. Carbon steel rusts in minutes. Wipe with a soft cloth, then store.
Oil for Long-Term Storage
Apply a thin coat of mineral oil before storing for days or weeks. This prevents rust and helps develop a protective patina.
Store Properly
Use a magnetic strip, knife block, or sheath. Avoid loose drawer storage unless blades are protected.
Test Sharpness Accurately—Don’t Guess
Pass the Paper Test
Hold a sheet of printer paper vertically. A sharp blade cuts cleanly with little pressure. If it tears, go back to the stones.
Slice a Tomato Skin
Try cutting a ripe tomato without peeling it. A sharp knife penetrates effortlessly. A dull one crushes the flesh first.
Try the Arm Hair Test (Carefully)
Lightly touch the edge to arm hair. If it shaves cleanly, you’ve achieved a razor edge. Only attempt with full control.
Final Note: Sharpening a carbon steel knife doesn’t require expensive gear or years of experience. With a 1000/6000 whetstone, consistent angle, and light pressure, you can achieve professional-level sharpness at home. The key is patience—let the stone do the work, monitor the burr, and progress through grits. Over time, sharpening becomes a satisfying ritual that keeps your favorite tools performing at their peak. Stay sharp, stay safe, and enjoy the precision only a well-maintained carbon steel blade can deliver.