Is your electric carving knife struggling to slice through a holiday roast, instead tearing and shredding the meat? You’re not alone. Over time, the serrated blades on electric carving knives lose their edge—especially after repeated use on tough cuts, skin, or accidental contact with bone. While many manufacturers suggest simply replacing the blades, knowing how to sharpen electric carving knife blades is a smarter, more sustainable solution. With the right tools and techniques, you can restore your knife’s performance to near-new condition—without spending extra money or contributing to unnecessary waste. This guide covers every proven method, tool, and insider tip so you can sharpen safely, precisely, and successfully.
Recognize When Your Blades Need Sharpening
Before reaching for any sharpening tool, confirm that your blades actually need it. A dull electric knife doesn’t just underperform—it behaves differently.
Signs Your Blades Are Dull
- Meat tears or shreds instead of slicing cleanly
- Increased resistance when cutting, requiring more pressure
- Uneven, jagged cuts on roasts, poultry, or fish
- Vibrations or snagging during use
- Blades catch on connective tissue or skin rather than gliding through
Serrated blades last longer than straight-edge knives because only the tip of each serration does the cutting. But repeated use wears down those tiny cutting edges. If you’re noticing any of these symptoms, your blades aren’t broken—they’re just dull. The good news? They can be restored.
Can You Actually Sharpen Electric Carving Knife Blades?
Yes—electric carving knife blades can be sharpened, despite what some manuals claim. Many manufacturers recommend replacement not because sharpening is impossible, but because it’s more profitable. In reality, with the right tools and care, you can sharpen serrated electric knife blades multiple times.
Why Sharpening Works
- Each serration has a beveled cutting edge on the inside
- Only the inside of the serration needs sharpening
- The flat back side is typically unsharpened and used only for deburring
- Tools exist that match the U-shaped or scalloped profile of most serrations
While more complex than straight blades, serrated edges can be restored—especially if made from quality steel. The key is using the right method and avoiding aggressive over-sharpening that removes too much material.
Best Tools for Sharpening Electric Carving Knife Blades
The right tool makes all the difference. Choose based on your skill level, budget, and how often you’ll sharpen.
Electric Knife Sharpeners with Serrated Slots
These are the easiest and most consistent option, especially for beginners.
Recommended Models
- Presto EverSharp 3-Stage Sharpener: Use only Stages 2 and 3 for serrated blades. Sharpen only the flat back side to preserve serration shape.
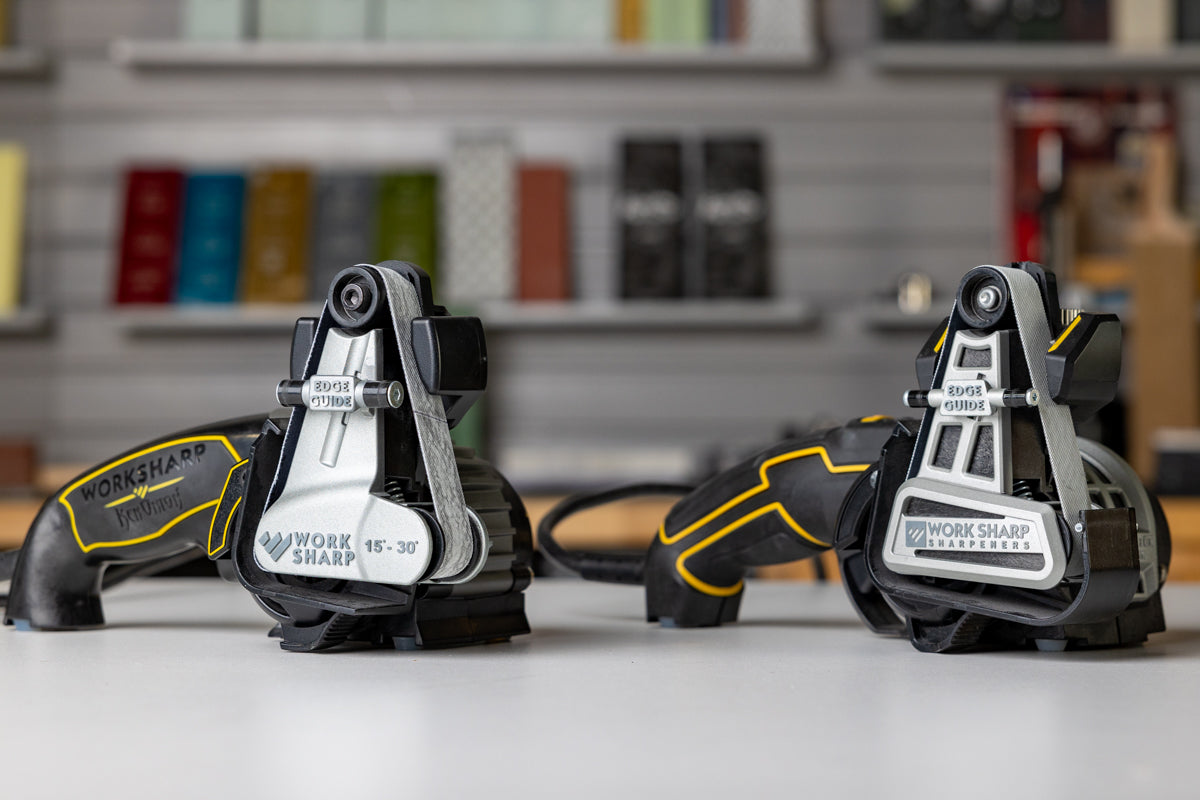
- Work Sharp Knife & Tool Sharpener (with Serrated Guide): Uses interchangeable belts (80–600 grit) and a precision guide for both flat and serrated edges.
How to Use
- Unplug the knife and remove blades
- Insert blade into serrated slot, cutting edge facing wheel
- Pull through 2–3 times with light pressure
- Start with coarse grit if blades are nicked
- Finish with fine grit for a polished edge
- Wipe clean and reassemble
Pro Tip: Let the sharpener do the work—never force the blade.
Manual Sharpening Rods (Diamond, Ceramic, or Steel)
Ideal for precision sharpening of each individual serration.
Best Types
- Diamond-coated rods: Aggressive; best for hardened or low-quality steel
- Ceramic rods: Smoother finish; great for maintenance
- Tapered round rods: Fit U-shaped serrations perfectly
Step-by-Step: Sharpen with a Rod
- Remove blades from handle
- Hold rod at 15°–20° angle, matching original bevel
- Insert rod into each serration
- Use 3–5 back-and-forth strokes per tooth
- Repeat for all serrations
- Deburr flat side with fine stone or sandpaper
Expert Note: Work slowly—this is a meditative task. Many users sharpen while watching TV to stay focused.
Round Serrated Knife Sharpeners (Hand Files)
Affordable, handheld files shaped to fit serrations. Often called “round knife sharpeners.”
How to Use
- Insert file into each serration
- Use 3–5 light strokes per tooth
- Match the original angle
- Deburr back side after
User Verdict: One angler revived decades-old blades using this method—“they were done and sharp again.”
5/32″ Chainsaw Files (DIY Option)
A budget-friendly alternative that works surprisingly well.
Why It Works
- 5/32″ round file matches U-shaped serration curvature
- Widely available at hardware stores
Sharpening Steps
- Clamp blade securely
- Insert file into each serration
- Use 1–2 light strokes per tooth
- Deburr flat side with fine whetstone or sandpaper
Warning: Too much pressure can deform serrations. Use a gentle touch.
Specialized Sharpening Systems
For frequent users or those who demand precision.
a. Lansky Serrated Stone System
- Uses flexible curved stones that fit into serrations
- Clamp holds blade steady
- Adjustable angle guides ensure consistency
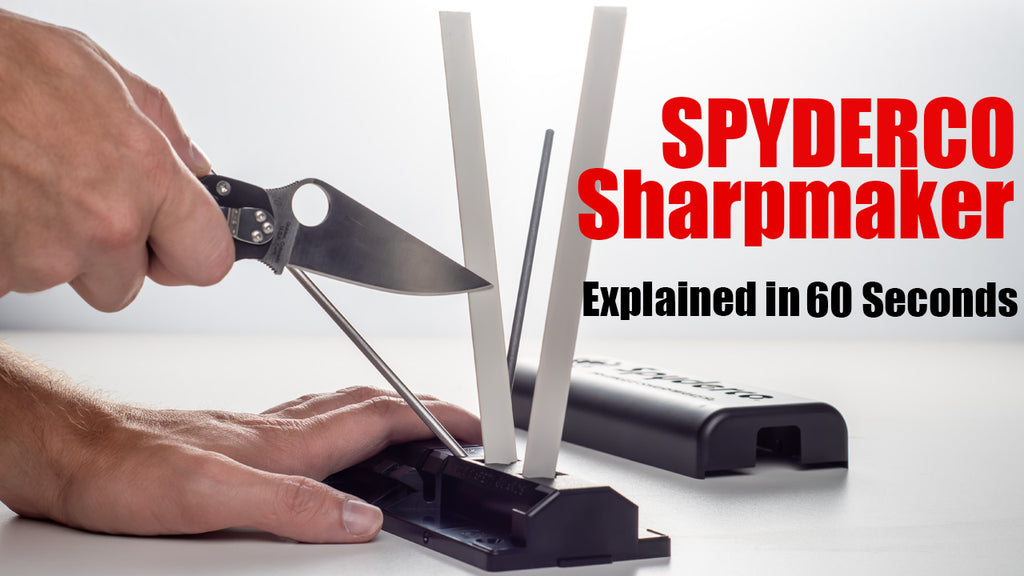
b. Spyderco Triangle Sharpening Kit
- Triangular ceramic rods access tight serrations
- Allows sharpening from multiple angles
- Users report blades cut “through fish like butter” afterward
c. Work Sharp with Serrated Guide
- Belt-driven system with coarse and fine belts
- Includes alignment jig for perfect angle
- Can sharpen both flat and serrated sides
Work Sharp Process
- Remove blade
- Use coarse belt (black) on flat side—5–10 swipes
- Switch to fine belt (purple)—4–5 passes
- Use serrated guide with fine belt on cutting edge
- Repeat for second blade
Result: Restores performance for filleting, carving, and slicing.
DIY and Alternative Methods
Not all sharpening requires specialty tools.
Wet/Dry Sandpaper on Glass
- Use 600–1000 grit sandpaper on a flat surface
- Drag flat back side in circular motion
- Great for deburring after sharpening
- Won’t sharpen serration tips
Dremel with Grinding Bit
- Use small cylindrical grinding bit
- Manually rotate into each serration
- High risk of overheating or uneven edges
- Not recommended for beginners
File and Whetstone Combo
- Use round file to reshape serrations
- Follow with flat whetstone to deburr back
- Offers maximum control
- Requires patience and steady hand
Safety Tips and Best Practices
Sharpening sharp tools is risky. Follow these rules.
Safety First
- Always disconnect power before removing blades
- Wear cut-resistant gloves—dull blades slip more easily
- Keep fingers behind the blade
- Never test sharpness with your fingertip—use paper or tomato
Sharpening Techniques
- Maintain 15°–20° angle across all serrations
- Sharpen only what’s needed—over-sharpening shortens life
- Always deburr the flat side after sharpening
- Clean blades with damp cloth, then dry thoroughly
Maintenance for Long Life
- Wipe clean after each use
- Never soak in water—leads to rust
- Store in sheath or case
- Avoid cutting frozen meat or bone
Performance After Sharpening: What to Expect
When done right, sharpening delivers like-new results.
Real-World Success
- Scout 2 sharpened 1980s-era blades multiple times—still cuts salmon and walleye cleanly
- dp revived old blades with a round sharpener: “They were dead—now they’re sharp again”
- Users report blades slicing through roast beef, turkey, and fish with ease
Limitations
- Low-quality steel may only sharpen 1–2 times
- Hardened steel (Dexter, Bubba) lasts longer and sharpens better
- Excessive material removal shortens blade life
Key Insight: Sharpening isn’t magic—it restores, not transforms. Severely damaged blades may still need replacement.
Sharpen vs. Replace: Cost and Impact
Is sharpening worth it? Let’s break it down.
| Factor | Sharpening | Replacement |
|---|---|---|
| Cost | $0–$100 (one-time tool cost) | $15–$30 per blade set |
| Time | 15–60 minutes | Instant |
| Long-Term Savings | High (especially frequent users) | None |
| Environmental Impact | Low (less waste) | High (discarded metal) |
| Skill Required | Moderate | None |
User Insight: One angler saved “hundreds—possibly thousands” by reviving old blades with a $100 Work Sharp. “Pays for itself in two seasons.”
Manufacturer Advice vs. Reality
Many brands say: “Replace, don’t sharpen.” Here’s the truth.
Manufacturer Claim
“Serrated blades cannot be sharpened—replace for safety and performance.”
User Reality
- Sharpening is safe with proper tools
- Replacement is unnecessary if serrations are intact
- Sharpening saves money and reduces waste
- Performance matches new blades when done correctly
Bottom line: Manufacturers benefit from replacements. You benefit from sharpening.
Choose the Right Method for You
Match your skill and needs to the best method.
| Method | Skill Level | Best For | Notes |
|---|---|---|---|
| Electric Sharpener (Presto, Work Sharp) | Beginner | Quick, consistent results | Must support serrated blades |
| Manual Sharpening Rod | Intermediate | Precision, minimal wear | Time-consuming |
| Round Serrated Sharpener | Beginner–Intermediate | Budget, portability | Works best on U-shaped serrations |
| Chainsaw File + Stone | Intermediate | DIY, low cost | Requires clamping |
| Lansky/Spyderco Systems | Intermediate–Advanced | Angle precision | Higher upfront cost |
| Work Sharp Belt System | Intermediate | Versatility (knives, tools) | Ideal for hunters/anglers |
Final Recommendations
For Beginners
Use a Presto EverSharp or Work Sharp with serrated guide. It’s foolproof, fast, and effective.
For Budget Users
Try a round serrated sharpener or 5/32″ chainsaw file. Costs under $20 and delivers real results.
For Anglers and Hunters
Invest in a Work Sharp or Spyderco system. Sharpen fillet knives, hunting blades, and electric knives—all with one tool.
For Maximum Control
Use manual rods or Lansky system to preserve blade geometry and extend lifespan.
Conclusion
Knowing how to sharpen electric carving knife blades saves money, reduces waste, and keeps your kitchen or camp kitchen running smoothly. Despite manufacturer claims, these serrated blades can and should be sharpened—not replaced. Whether you use an electric sharpener, handheld file, or precision system, the right technique restores clean, effortless cutting. With a little practice, you’ll revive dull blades in minutes and extend their life for years. Don’t throw them out—sharpen them back to life.