Yes, you can sharpen a bread knife—and if it’s losing its bite, you should. Despite widespread myths that serrated blades are “maintenance-free” or impossible to sharpen, modern serrated knives are designed to be restored. A dull bread knife doesn’t need to be replaced; it just needs attention. If your once-precise blade now crushes crusty sourdough, mangles ripe tomatoes, or requires excessive force to saw through a baguette, it’s not worn out—it’s overdue for sharpening. With the right tools and technique, you can bring back its original slicing power, often making it perform like new. This guide walks you through exactly how to sharpen a serrated bread knife safely and effectively, using methods trusted by professionals and home cooks alike. You’ll learn how to identify dullness, understand your blade’s anatomy, choose the best sharpening tools, and follow step-by-step techniques that preserve your knife’s precision edge.
Signs Your Bread Knife Is Dull
Bread Tears or Crushes Instead of Slicing
A sharp bread knife cuts with a gentle sawing motion, cleanly separating the loaf without pressure. If your bread crumbles, flattens, or resists cutting, the serrations have lost their grip. This is the most obvious sign that sharpening is needed.
You Need Excessive Pressure to Cut
If you’re pressing down hard to get through a crust, the tips of the serrations are rounded and no longer biting into the surface. This not only reduces cutting efficiency but also increases the risk of the blade slipping and causing injury.
Tomatoes Get Squished, Not Sliced
A classic test of a sharp serrated edge: a ripe tomato should slice cleanly with minimal pressure. If the fruit bursts or deforms under the knife, the serrations are too dull to perform.
Serration Tips Appear Flattened
Use a magnifying glass to inspect the tips of the teeth. A sharp serration ends in a fine point. If the tips look rounded, hooked, or worn down, it’s time to sharpen.
Anatomy of a Serrated Bread Knife
Teeth and Gullet Design
Each serration consists of a tooth (the pointed tip) and a gullet (the valley between teeth). The tooth acts like a tiny saw blade, gripping and cutting into food, while the gullet clears crumbs and allows smooth motion. This design reduces friction and enables clean slicing with minimal downward force.
Beveled vs. Flat Side
One side of the blade has a beveled edge behind each tooth—this is the only side that should be sharpened. The opposite side is nearly flat, serving as a guide during cutting. Sharpening both sides destroys the asymmetrical geometry, turning your precision blade into a blunt, inefficient tool.
Types of Serrations
- Pointed serrations: Deep, aggressive teeth ideal for crusty breads like baguettes and sourdough.
- Scalloped (rounded) serrations: Softer, wave-like edges perfect for soft breads, cakes, and delicate pastries.
- Hybrid patterns: A mix of both, offering versatility for everyday use.
Knowing your knife’s serration type helps you choose the right sharpening method and tool.
Best Tools for Sharpening Serrated Knives
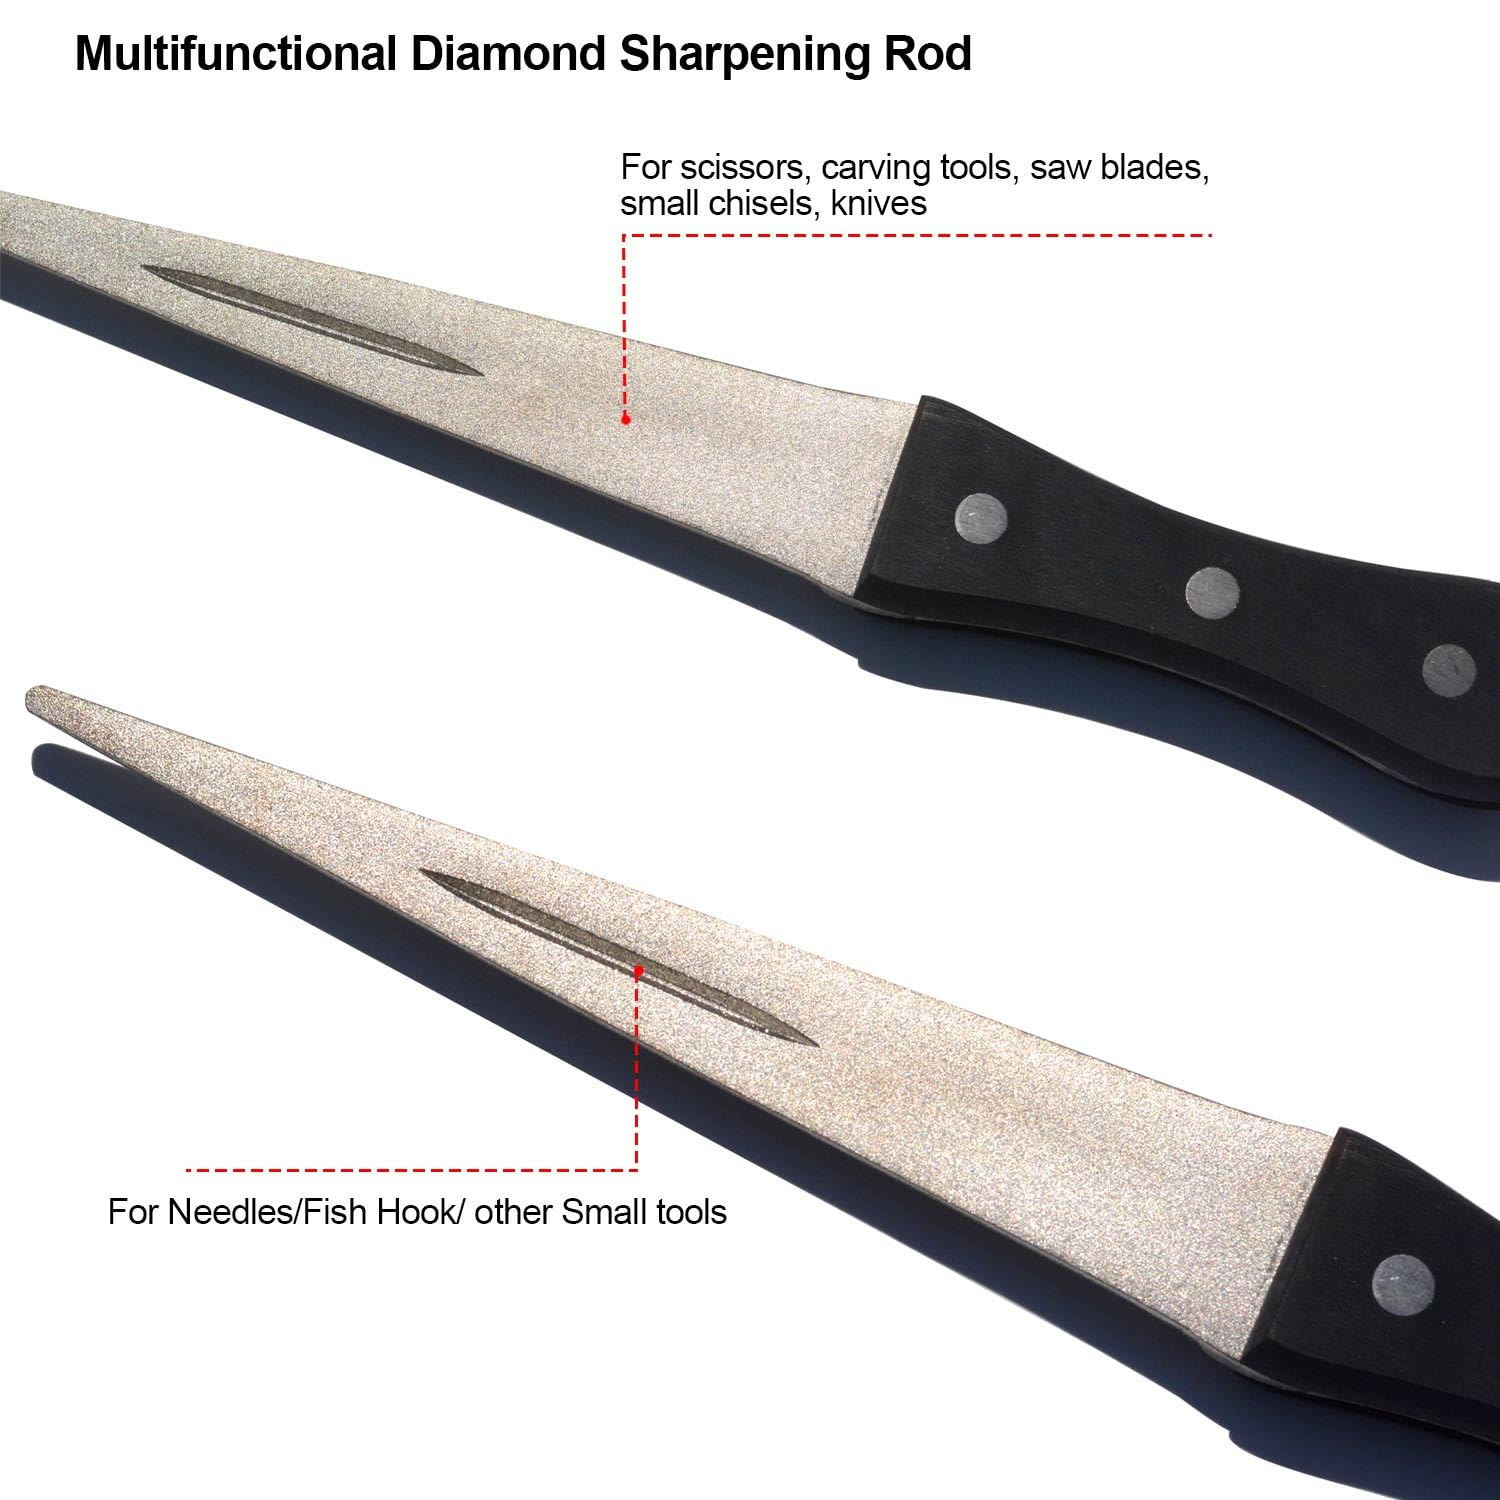
Tapered Diamond or Ceramic Rod
The most effective and widely recommended tool. A tapered rod fits into the varying gullets of your blade, allowing you to sharpen each tooth individually. Diamond rods cut faster and are ideal for dull or damaged edges; ceramic rods are finer, better for maintenance and light sharpening. Choose a rod that fits snugly in both the narrowest and widest gullets—typically 8–10” long with a 6–14mm taper.
Sandpaper-Wrapped Dowel (DIY Option)
A budget-friendly alternative: wrap 400–600 grit wet/dry sandpaper around a pen, pencil, or wooden dowel. This lets you customize the rod size to match tight serrations. Secure with tape and use it to sharpen the beveled side of each tooth with light, side-to-side motions.
Chamfered Whetstone Edge
For advanced users, use the sharp 90° corner of a whetstone (1000–8000 grit) to access each serration. Ideal for wavy or scalloped edges like those on Shun or Tojiro knives. Avoid stones with heavily rounded edges—they won’t fit into the gullets.
Tapered Diamond File
A precision tool like the DMT tapered diamond file offers aggressive sharpening for neglected blades. It’s excellent for restoring heavily dulled serrations but should be used carefully to avoid over-removal of metal.
Important: Steel honing rods do not sharpen—they only realign the edge. True sharpening requires material removal.
Step-by-Step: Sharpening with a Tapered Rod
Secure the Knife
Place the knife on a non-slip surface—a folded towel or rubber mat works well. Position it with the beveled side up and the tip slightly overhanging the edge for better access.
Match the Factory Angle
Most bread knives have a 15°–20° bevel. Insert the rod into the first gullet and angle it to match the existing bevel. Don’t force a new angle—follow the factory grind.
Stroke Away from the Blade
Draw the rod from heel to tip, moving away from the blade. Use 3–5 light strokes per serration. Let the abrasive do the work—no heavy pressure is needed.
Work One Tooth at a Time
Move systematically across the blade. Consistency is key: too many strokes on one tooth can unbalance the edge and reduce cutting efficiency.
Check for a Burr
After sharpening all teeth, run your fingertip along the flat side of the blade just behind the edge. A slight roughness or lip (burr) means metal has been removed and a new edge is forming.
Deburr the Flat Side
Lay the flat side on a fine whetstone (3000+ grit) or 2000 grit sandpaper. Draw the blade straight forward once or twice—do not angle it. This removes the burr without creating a secondary bevel.
Clean and Test
Wipe off metal filings with a damp cloth. Wash and dry the knife thoroughly. Test it on crusty bread or a ripe tomato. It should slice cleanly with minimal effort.
Time estimate: 15–30 minutes for first-time sharpening; 5–10 minutes for touch-ups.
DIY Method: Sandpaper on a Pen
Prepare the Tool
Wrap 600 grit wet/dry sandpaper around a ballpoint pen or mechanical pencil. Cut to size and tape if needed. For wider gullets, use a larger dowel.
Sharpen Each Serration
Insert the sandpaper-covered rod into each gullet. Match the factory bevel and move the rod side to side with light pressure. 2–3 passes per tooth are usually enough.
Deburr with Fine Sandpaper
Lay 2000 grit sandpaper on a flat surface. Gently drag the flat side of the blade across it in a straight line—zero angle. This removes the burr.
Strop for a Finishing Touch
Rub the beveled side across a leather strop or even cardboard to polish the edge and remove micro-burrs.
User result: “Cuts through paper like a new blade—couldn’t believe it was my old knife.”
Advanced: Whetstone Edge Sharpening
Use the Stone’s Corner
For wavy or scalloped serrations (e.g., Shun), use the sharp 90° corner of a whetstone. Avoid stones with heavily chamfered edges.
Sharpen the Beveled Face
Insert the corner into each serration. Pull the stone across the front face of the tooth at the original angle. Use 5–10 strokes per tooth.
Maintain Consistent Angle
Use your fingertip as a guide or employ a sharpening jig for precision. Inconsistent angles lead to uneven edges.
Protect the Blade Back
Tape the spine and flat side to prevent scratches from the stone’s edge.
Common Sharpening Mistakes to Avoid
Sharpening Both Sides Equally
Mistake: Treating the blade like a straight knife.
Consequence: Destroys the asymmetrical design.
Fix: Only sharpen the beveled side. Lightly deburr the flat side—never grind it.
Using a Flat Whetstone Across the Edge
Mistake: Dragging a flat stone along the entire serrated edge.
Consequence: Flattens the teeth into a hybrid straight edge.
Fix: Use tools that match the gullet shape—tapered rods or stone corners.
Over-Sharpening the Teeth
Mistake: Applying too many strokes per tooth.
Consequence: Shortens the teeth, reducing their ability to grip.
Fix: 3–5 strokes per serration is sufficient. Sharpen only when performance drops.
Using Pull-Through or Electric Sharpeners
Mistake: Running the knife through a standard sharpener.
Consequence: Removes 0.1–0.2mm of metal per pass, quickly destroying the serration profile.
Fix: Only use pull-through sharpeners specifically designed for serrated blades—and even then, sparingly.
Skipping Burr Removal
Mistake: Leaving the burr on the flat side.
Consequence: Creates a ragged edge that tears food.
Fix: Lightly draw the flat side across a fine stone—one pass is enough.
Not Cleaning After Sharpening
Mistake: Using the knife without wiping it.
Consequence: Metal filings can contaminate food.
Fix: Wash the blade by hand, dry immediately, and store properly.
When to Sharpen vs. Replace
Sharpen If:
- Teeth are intact but dull.
- Knife is high-quality (e.g., Wusthof, Shun, Global).
- Only minor rounding is visible.
- You’ve maintained it well and use proper cutting boards.
Replace If:
- Teeth are chipped, broken, or bent.
- There’s rust pitting near the edge.
- Previous sharpening has flattened the serrations.
- The knife is low-quality with soft steel (won’t hold an edge).
Professional sharpening services can restore heavily damaged blades—ideal for sentimental or high-end knives.
Maintenance Tips for Long-Lasting Sharpness
Use the Right Cutting Board
Best: Wood or high-density plastic.
Avoid: Glass, stone, ceramic, or marble—they dull serrations 50–70% faster.
Hand Wash Only
Never put in the dishwasher. Harsh detergents, heat, and tumbling damage the blade and handle. Wash with mild soap and warm water, then dry immediately.
Store Properly
Prevent edge damage with:
– Blade guards
– Slotted knife blocks
– Magnetic strips
– In-drawer organizers with individual slots
Avoid tossing the knife into a drawer—it will dull quickly.
Use It for the Right Tasks
- Do: Slicing bread, tomatoes, cakes, and delicate pastries.
- Don’t: Pry, twist, cut frozen food, bones, or hard items.
Using the wrong knife for the job accelerates wear.
Honing vs. Sharpening: Know the Difference
Honing (Every 2–3 Months)
- Purpose: Realigns the edge, not sharpen it.
- Tool: Ceramic rod with light passes.
- Use when: The knife feels slightly off but still cuts.
Sharpening (As Needed)
- Purpose: Removes metal to restore the edge.
- Tool: Tapered rod, sandpaper, or whetstone corner.
- Use when: Cutting performance declines significantly.
Professional Service (Every 2–3 Years)
- Purpose: Deep restoration, especially for wavy or damaged serrations.
- Tool: Specialized equipment and expertise.
- Best for: High-end or sentimental knives.
Key point: Honing does not replace sharpening. It’s maintenance, not repair.
Final Thoughts
A bread knife is not disposable. With proper care, a high-quality serrated blade can last decades. Sharpening isn’t hard—just different. Use a tapered rod, respect the beveled side, and avoid aggressive tools. Your knife will reward you with clean, effortless cuts every time. Now that you know can you sharpen a bread knife, the answer is clear: yes—and you should.